Mail Configuration / SMTP Setup
Cpanel
To create and configure an SMTP email account using cPanel, follow the steps below:
Step 1: Log in to cPanel
Step 2: Create an Email Account
- In cPanel, go to "Email Accounts".
- Click "Create".
- Fill in:
- Username: e.g., info, test, or hr
- Domain: Select the correct domain (if multiple are available)
- Password: Set a strong password or use the generator
- Click Create.
📌 This creates an email like test@yourdomain.com
Step 3: Get SMTP Settings
Once the email is created:
- Go to "Email Accounts" again.
- Find your new email and click "Connect Devices".
- You'll see the SMTP settings under the Mail Client Manual Settings section like below image:
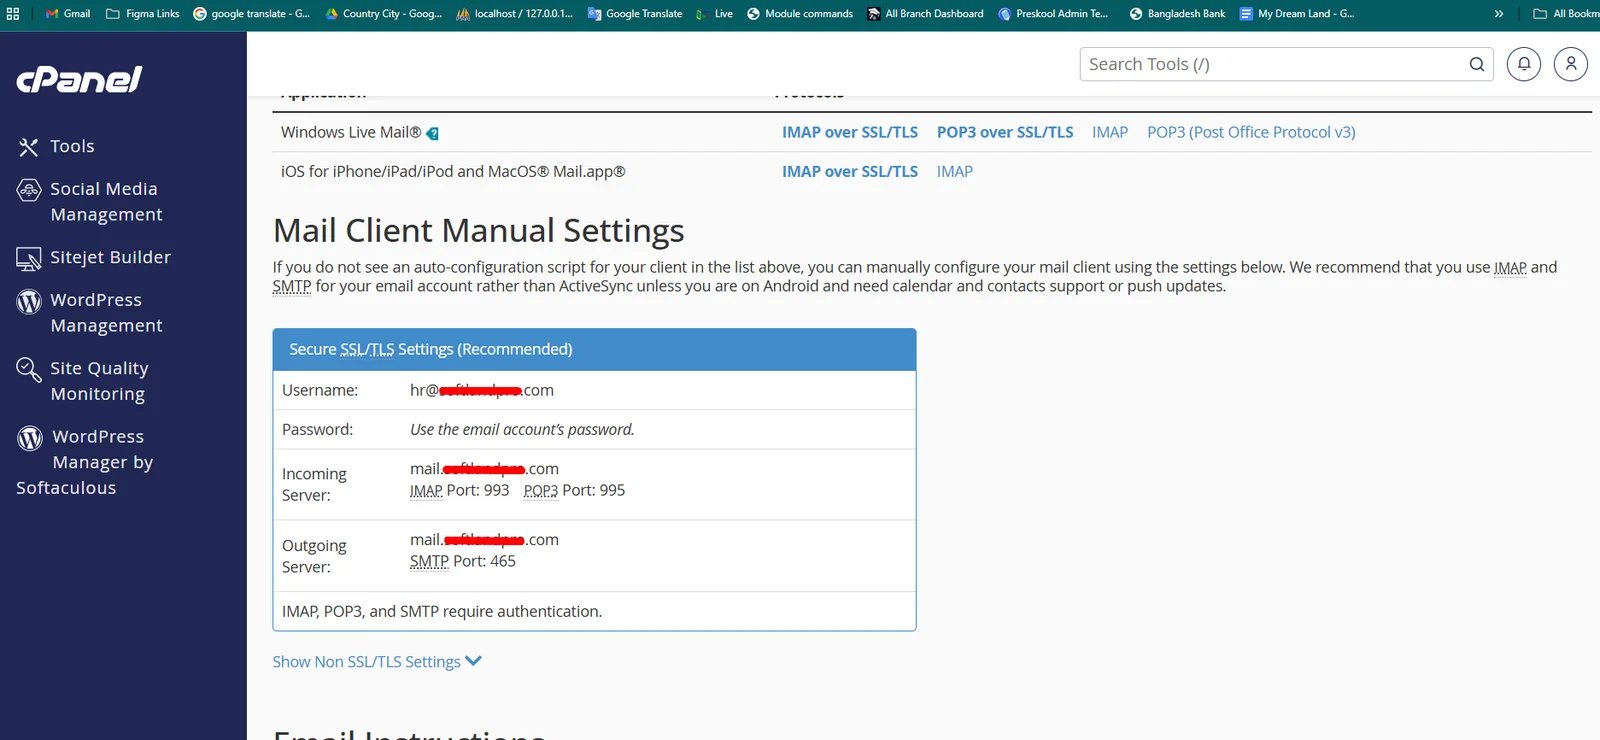
Example:
| Input | Value |
|---|---|
| QUEUE_MAIL | Select true / false, (If you select true, you need to run the following command: php artisan queue:work on server) |
| MAIL_DRIVER_TYPE | Select MAIL MAILER / MAIL DRIVER |
| MAIL_DRIVER | Use sendmail if your server has a local mail server installed (like Postfix or Exim). Use smtp when sending emails through an external mail service (like Gmail, Mailgun, or your hosting provider's SMTP server). |
| MAIL_HOST | mail.yourdomain.com |
| MAIL_PORT | 587 |
| MAIL_USERNAME | test@yourdomain.com |
| MAIL_PASSWORD | The one you set |
| MAIL_ENCRYPTION | tls |
| MAIL_FROM_ADDRESS | yourmail@gmail.com |
| MAIL_FROM_NAME | Your project/app name |
Set the values to System Settings → Mail Configuration
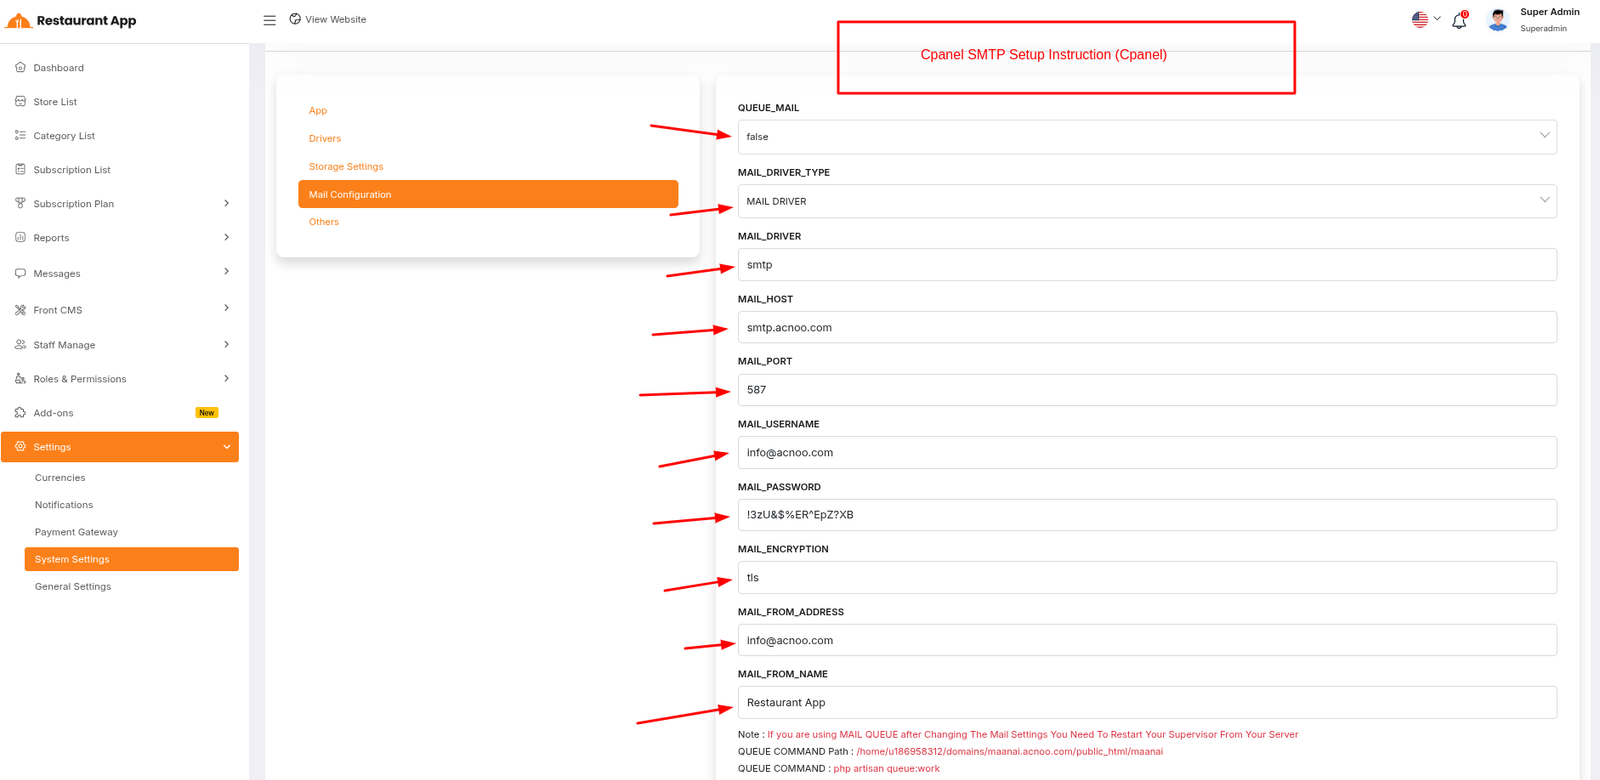
If you want to know more details please follow their Official documentation. Here is also a youtube video link for reference.
Hostinger Panel
To create and configure an SMTP email account using Hostinger, follow the steps below:
Step 1: Log In to Hostinger hPanel — https://hpanel.hostinger.com
Step 2: Create an Email Account
- Go to Emails from the top menu.
- Select your domain name.
- Click "Create New Email Account".
- Fill in:
- Email address (e.g., info, test, or hr)
- Password
- Click "Create".
📌 This creates an email like test@yourdomain.com
Step 3: Get SMTP Settings
- After creating the email, go back to the Email Accounts section.
- Find your email and click "Connect App & Devices" or "Set Up Devices".
- Look for the Manual Configuration or SMTP Settings.
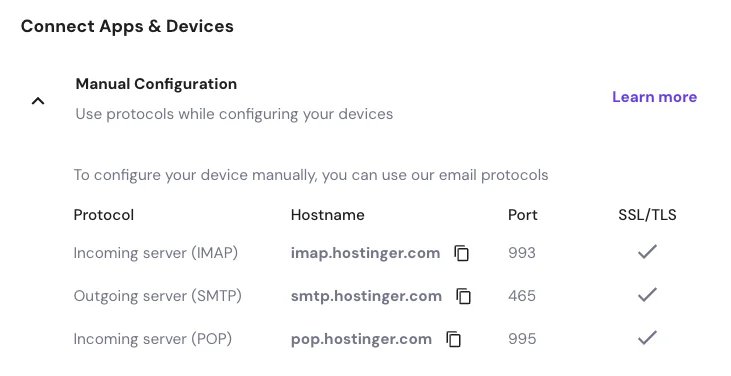
Example:
| Input | Value |
|---|---|
| QUEUE_MAIL | Select true / false, (If you select true, you need to run the following command: php artisan queue:work on server) |
| MAIL_DRIVER_TYPE | Select MAIL MAILER / MAIL DRIVER |
| MAIL_DRIVER | Use sendmail if your server has a local mail server installed (like Postfix or Exim). Use smtp when sending emails through an external mail service (like Gmail, Mailgun, or your hosting provider's SMTP server). |
| MAIL_HOST | mail.yourdomain.com |
| MAIL_PORT | 465 |
| MAIL_USERNAME | test@yourdomain.com |
| MAIL_PASSWORD | The one you set |
| MAIL_ENCRYPTION | ssl |
| MAIL_FROM_ADDRESS | yourmail@gmail.com |
| MAIL_FROM_NAME | Your project/app name |
Set the values to System Settings → Mail Configuration
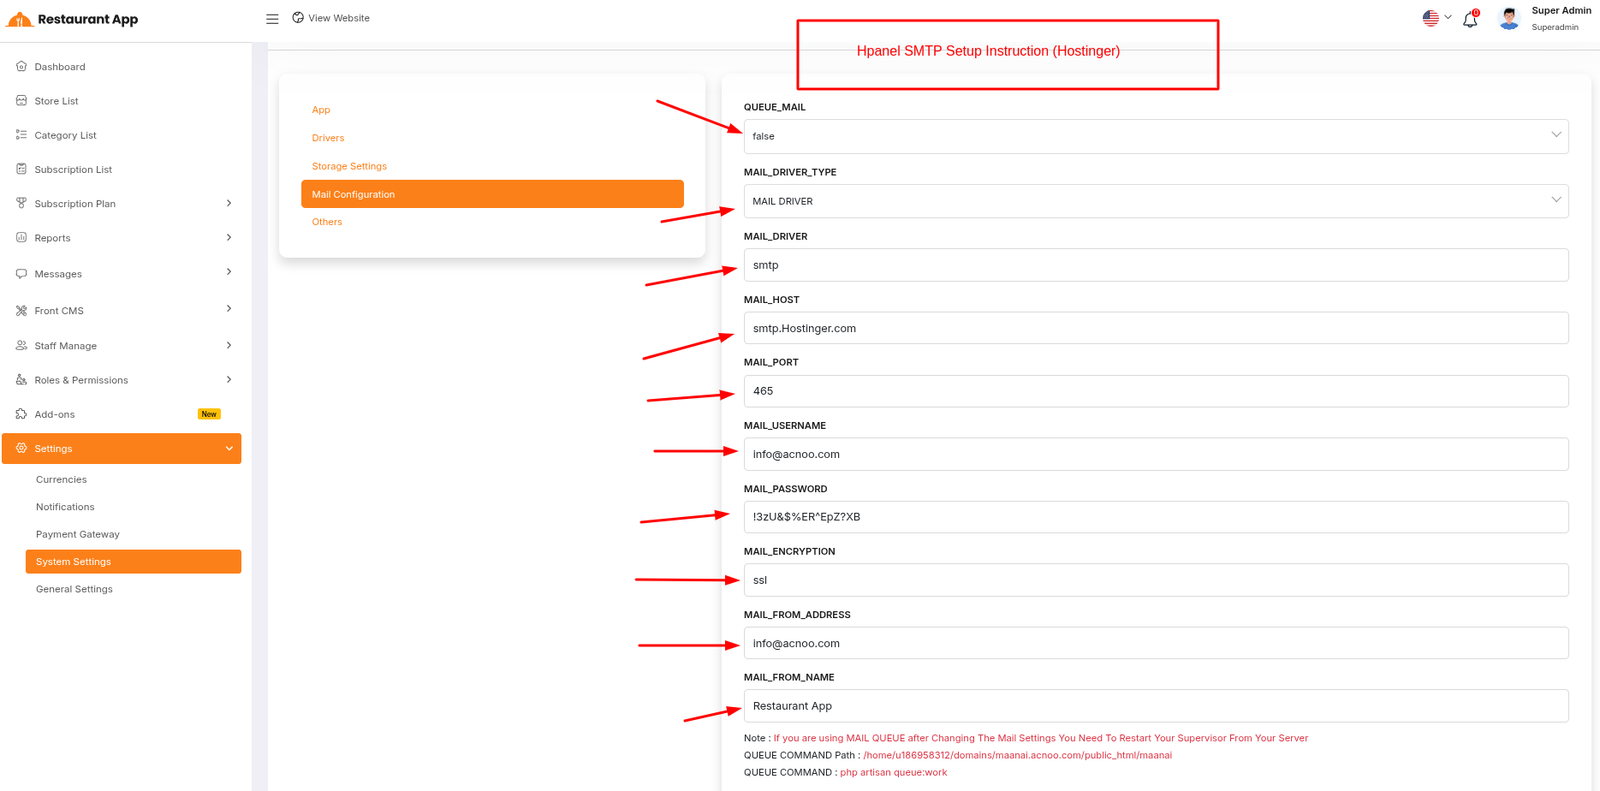
If you want to know more details please follow their Official documentation. Here is also a youtube video link for reference.
Please note that if you change QUEUE_MAIL from false to true, you need to run the following command: php artisan queue:work. Remember: The command path should be: /home/u186958312/domains/yourdomain.com/public_html. Make sure you're in the correct path.
If you're not familiar with running the command, there's another option. Simply visit yourdomain.com/queue-work and it will be executed automatically.
If you select QUEUE_MAIL as true but do not run the command or visit the URL, email functionality will not work properly.
Gmail
To create and configure an SMTP email account using Gmail, follow the steps below:
Step 1: Enable 2-Step Verification on Google Account
- Go to https://myaccount.google.com
- Click "Security" from the left menu.
- Under "Signing in to Google", enable 2-Step Verification.
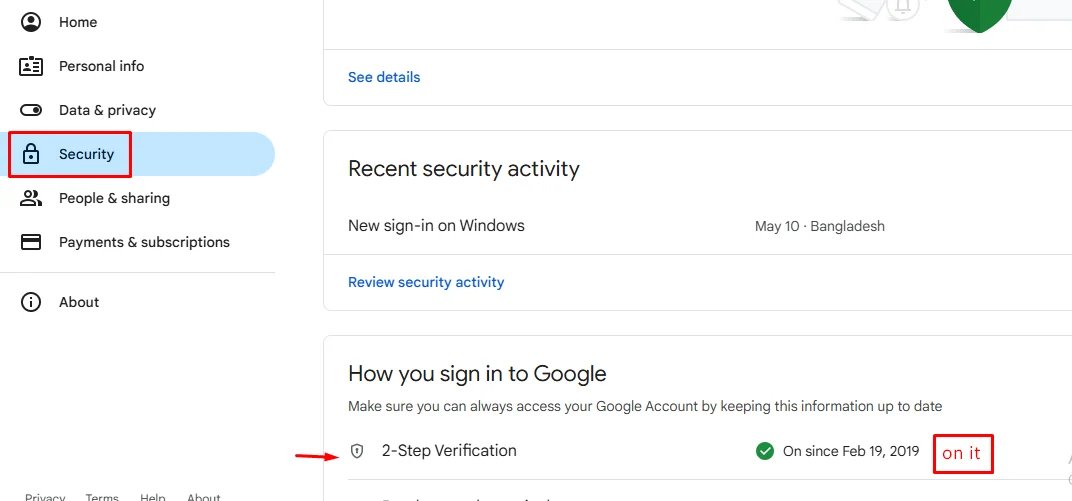
- Complete the setup with your phone or other options.
Step 2: Create an App Password
After enabling 2-Step Verification:
- Visit: https://myaccount.google.com/apppasswords
- Sign in if asked.
- Under "Select the app", choose Other (Custom name).
- Give it a name like "SMTP App" and click Generate.
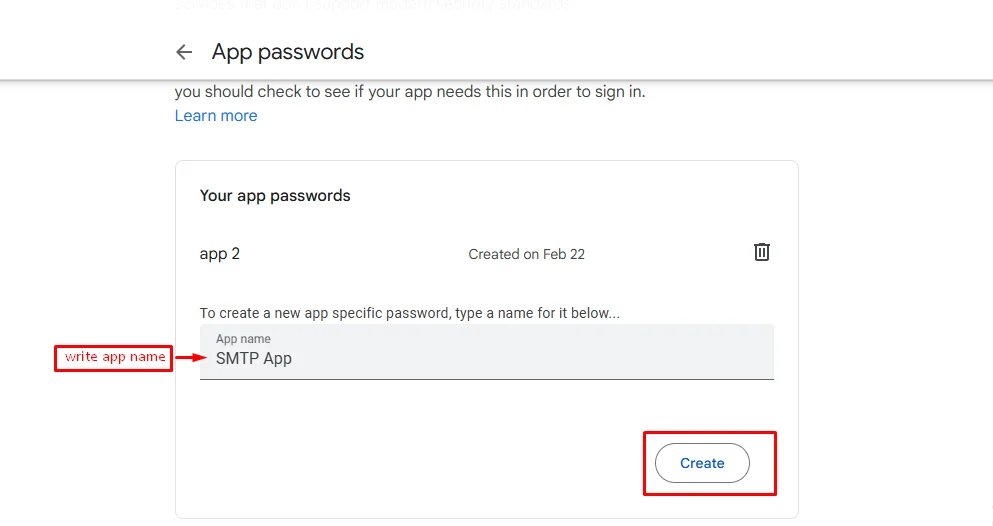
- Google will show you a 16-character password — copy it. You'll use this as your SMTP password.
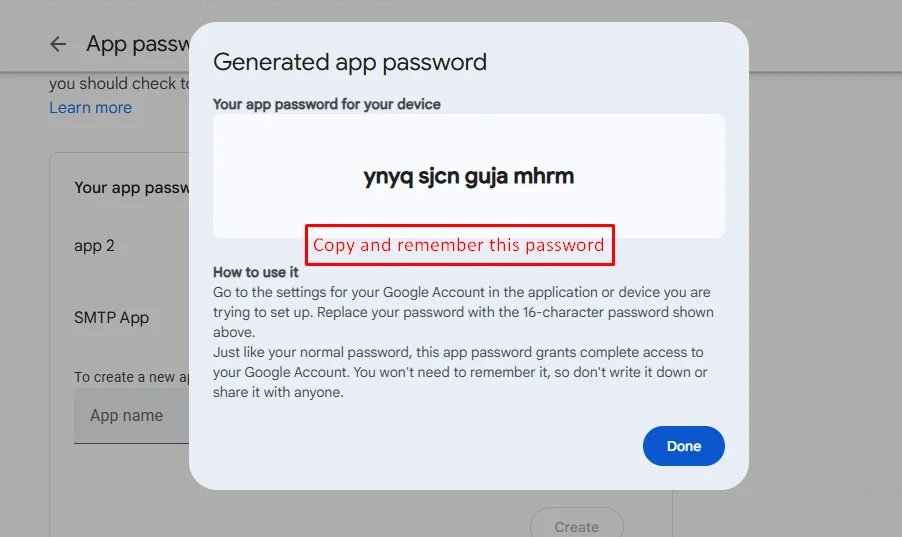
Example:
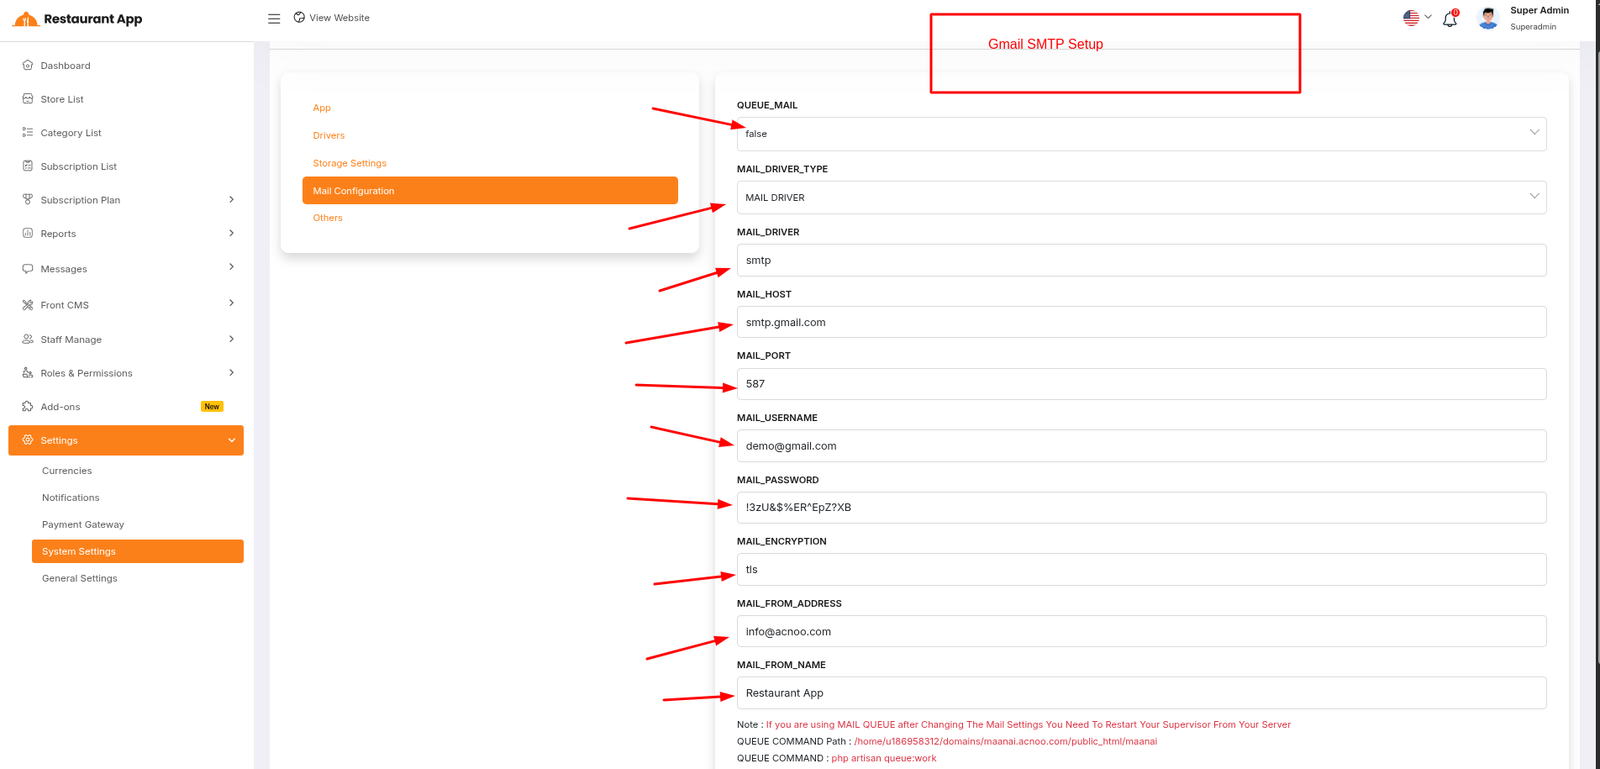
| Input | Value |
|---|---|
| QUEUE_MAIL | Select true / false, (If you select true, you need to run the following command: php artisan queue:work on server) |
| MAIL_DRIVER_TYPE | Select MAIL MAILER / MAIL DRIVER |
| MAIL_DRIVER | smtp |
| MAIL_HOST | smtp.gmail.com |
| MAIL_PORT | 587 |
| MAIL_USERNAME | your_email@gmail.com |
| MAIL_PASSWORD | your_app_password |
| MAIL_ENCRYPTION | tls |
| MAIL_FROM_ADDRESS | your_email@gmail.com |
| MAIL_FROM_NAME | Your project/app name |
Set the values to System Settings → Mail Configuration
If you want to know more details please follow their Official documentation. Here is also a youtube video link for reference.
← Settings | Index | Change Logs →